Hello, fellow readers!


The surface under the chin of the lizard is looking very good. Sadly, this was not the case for the bottom of the hat. It received severe damages by the supports. Even the post-processing with Dremel couldn't save the situation much. After all the FDM technology isn't perfect and such things occur.
With this I am concluding today's episode! Hope that you had fun reading it!
Until next time!
Your favorite 3D printing enthusiast is here yet again to bring you another episode of Vili's bizarre 3D printing adventures!
In the following articles I am going to discuss the printing process of the third batch of figurines that I received from my instructor Martin Punchev. This time the theme was rather reptilian. There was a lizard and two frog fighters who really love to battle with each other. ;)
Today I am going talk about the model of the lizard businessman done by Donka Raykova as part of the Character design course at CGZEN.
 |
| Lizard businessman by Donka Raykova |
The final result was absolutely fantastic! Just wait a bit more for the grande finale! ;)
Model analysis
Our lizard boy is separated into eleven parts. Of course, the ones who need our attention are the head, body and the tail. Look at the small scales under the chin. We clearly have to show them. The other pieces can use more faster settings.
 |
| The model imported into 3Ds Max |
As we already know from the article about the beetle, we have to pay attention to the small parts. In the current case those are the hands. The hat can also cause some possible troubles due to the not entirely flat surface.
Importing into 3Ds Max and scaling the model up to 1500% results in Cura the exact 15 cm height. We are in the size limit! Perfect!
In the end all parts will be glued to their respective places. Now lets slice!
Slicing in Cura
For this project I decided to start with the bigger objects - head, body and tail. They are the spotlight of our character after all!
 |
| The body sliced in Cura |
 |
| The tail sliced in Cura |
 |
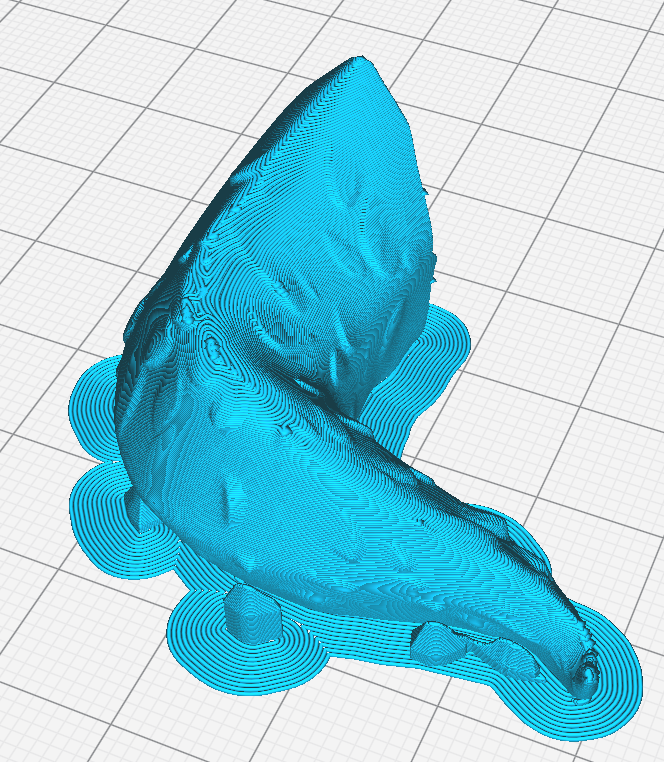
| The head sliced in Cura |
For the head the supports are inevitable. The overhang is too big under the chin. As for the torso and tail I enabled the support option just in case.
Settings - torso:
- Layer height - 0.1mm
- Infill - Gyroid pattern, 10%
- Supports - Touching buildplate, Density - 40%, Pattern - Grid, Support Z distance - 0.3mm
- Buildplate adhesion - Brim
- Nozzle diameter - 0.4mm
- Time taken - 2 hours 20 minutes
Settings - tail:
- Layer height - 0.1mm
- Infill - Grid pattern, 25%
- Supports - Touching buildplate, Density - 25%, Pattern - Grid, Support Z distance - 0.3mm
- Buildplate adhesion - Brim
- Nozzle diameter - 0.4mm
- Time taken - 52 minutes
Settings - head:
- Layer height - 0.1mm
- Infill - Gyroid pattern, 10%
- Supports - Touching buildplate, Density - 45%, Pattern - Grid, Support Z distance - 0.3mm
- Buildplate adhesion - Brim
- Nozzle diameter - 0.4mm
- Time taken - 3 hours
The essential about 3D printing is the good amount of geometry in the model. Combined with the Layer height property in the slicer, great results can be achieved! See how nice the details look! Of course, when I say good amount of geometry this doesn't mean tons of billions of polygons! After all every software has it's limits!
Even Cura isn't almighty! Just try to keep the polycount between 500k-700k. If your model has a lot of details, try to refactor it and remove the minor ones. Last but not least use the Decimation master in ZBrush! It will help you maintain the details while reducing the polycount to normal numbers.
 |
| The hat sliced in Cura |
As I mentioned earlier in this post the hat was really tricky to print. The bottom of the model is not entirely flat. Even the added supports didn't help much. The end result was rather rough. I am still thinking how could I have done this better, hmm...
Settings :
- Layer height - 0.06mm
- Infill - Grid pattern, 40%
- Supports - Touching buildplate, Density - 45%, Pattern - Grid, Support Z distance - 0.3mm
- Buildplate adhesion - Brim
- Nozzle diameter - 0.4mm
- Time taken - 2 hours 53 minutes
 |
| The hand sliced in Cura |
Okay, the hand was really strange for some reason. When I printed the first draft with 0.06mm layer height and supports, the resulted model was just awful. Switching back to the fast settings and slightly rotating the object, the print turned out better much to my surprise. I don’t know what to say, just the small miracles in 3D printing. :)
Settings :
- Layer height - 0.14mm
- Infill - Grid pattern, 30%
- Buildplate adhesion - Skirt
- Nozzle diameter - 0.4mm
- Time taken - 8 minutes
 |
| The pants sliced in Cura |
The last interesting part here is the pants of our lizard guy. To escape the supports I just turned them upside down.
Settings :
- Layer height - 0.06mm
- Infill - Grid pattern, 25%
- Buildplate adhesion - Brim
- Nozzle diameter - 0.4mm
- Time taken - 1 hour 43 minutes
To sum it all up the entire model was pretty easy and straightforward to print. It took me like four days to complete it. Now let's see how the parts turned out!
Post print


Almost assembled! Look how cute is he! I think he is about to make me an offer I cannot refuse. ;)
The surface under the chin of the lizard is looking very good. Sadly, this was not the case for the bottom of the hat. It received severe damages by the supports. Even the post-processing with Dremel couldn't save the situation much. After all the FDM technology isn't perfect and such things occur.
With this I am concluding today's episode! Hope that you had fun reading it!
Until next time!
Коментари
Публикуване на коментар