Another day, another entry in my 3D printing journal. Welcome!
I am already halfway through in writing about this exciting colaboration with my mentor Martin Punchev. Only four more articles left until the big final! I can't wait to share all of them with you!
Today the subject of my blog post is going to be the figurine of one very strong frog MMA fighter! It was created by Kiril Kolev during the Character design course at CGZEN.
This frog boy is ready for epic battle! I remember that I started to work on the two frog models (in the next article I will talk about the frog boxer) somewhere at the beginning of December. I enjoyed making up stories of how the two always fight for somehting. :D
These are the original renders of the frog MMA fighter done by Kiril Kolev. You can find the full artwork on this link: https://www.artstation.com/artwork/gJXXb8
Model analysis
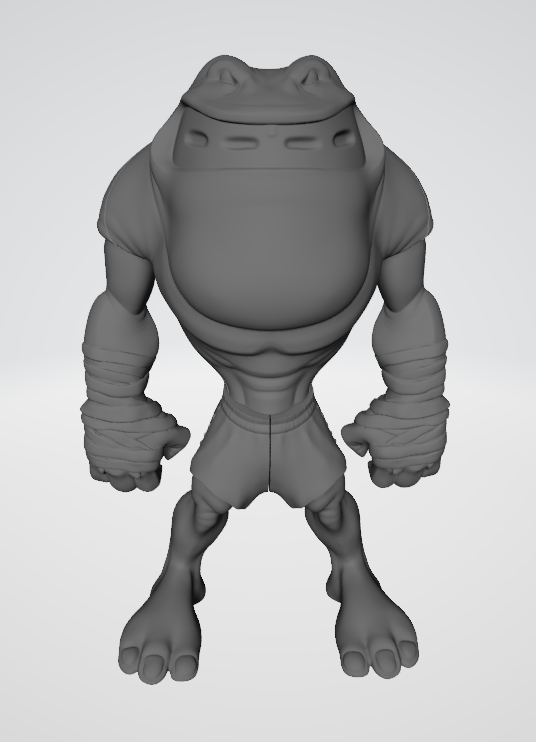
The current object again is very easy and pretty straightforward to print. It consists of six parts in total. As per the set up the model will be static (no movable parts).
The main focus here is the face, arms and legs. With less details is only the back of the frog. Supports will be needed for the arms and the legs. After an import into 3Ds Max a scole of 2500% was given. The height which Cura shows is 146 mm which is almost 15 cm. The size is within the given limit.
Slicing in Cura
I will try to keep this short since the object was very easy and didn't have troubles during the printing process (well, almost...). First lets see what's going on with the face:
Here I want to show the details of the face and thats why I used a higher resolution. Also the bottom of the object is a perfect flat surface which laid down on the buildplate very nicely.
Settings:


Overall all parts turned out okay. The bottom of the arms couldn't be saved,sadly.
I am already halfway through in writing about this exciting colaboration with my mentor Martin Punchev. Only four more articles left until the big final! I can't wait to share all of them with you!
Today the subject of my blog post is going to be the figurine of one very strong frog MMA fighter! It was created by Kiril Kolev during the Character design course at CGZEN.
 |
| Frog MMA fighter by Kiril Kolev |
 |
| Image used with permission, courtesy of Kiril Kolev |
 |
| Image used with permission, courtesy of Kiril Kolev |
These are the original renders of the frog MMA fighter done by Kiril Kolev. You can find the full artwork on this link: https://www.artstation.com/artwork/gJXXb8
Model analysis
The current object again is very easy and pretty straightforward to print. It consists of six parts in total. As per the set up the model will be static (no movable parts).
 | |
|
Slicing in Cura
I will try to keep this short since the object was very easy and didn't have troubles during the printing process (well, almost...). First lets see what's going on with the face:
 |
| The face sliced in Cura |
Settings:
- Layer height - 0.1mm
- Infill - Gyroid pattern, 8%
- Buildplate adhesion - Brim
- Nozzle diameter - 0.4mm
- Time taken - 3 hours 20 minutes
The hands are very tricky here because our froggy boy has bandages with details that must be showed. The bad news - we can't escape the supports. What can be done here is to place them in such a way to at least hide the damages. The next screenshot shows the placement:
 |
| The arm sliced in Cura |
Settings:
- Layer height - 0.12mm
- Infill - Lines pattern, 20%
- Supports - Touching buildplate, Density - 45%, Pattern - Grid, Support Z distance - 0.3mm
- Buildplate adhesion - Brim
- Nozzle diameter - 0.4mm
- Time taken - 2 hours 10 minutes
As you can see the generated supports are damaging the bottom part of arm, especially the bandages. I couldn't risk with higher support density here, so I left it under 50% (remember the head of the beetle, right?).
 |
| The leg sliced in Cura |
This is the leg with part of the pants. The waist area has a nice flat surface bottom that lays down perfectly on the glass. Of course, supports are a must.
Settings:
- Layer height - 0.12mm
- Infill - Lines pattern, 15%
- Supports - Touching buildplate, Density - 45%, Pattern - Grid, Support Z distance - 0.3mm
- Buildplate adhesion - Brim
- Nozzle diameter - 0.4mm
- Time taken - 2 hours 48 minutes
Time to see what happened after printing!
Post print


Overall all parts turned out okay. The bottom of the arms couldn't be saved,sadly.
The last picture is of the first draft of the face. I don't know how this happened but the fillament got tied in a knot and ruined the print in the last 50 minutes. You can see the inside which is the gyroid infill pattern.
This post was a rather short one. Still, I hope that you enjoyed reading it!
See ya!~
Коментари
Публикуване на коментар