Greetings, dear readers!
With this journal entry I am starting the countdown to the end of this project! Also I see that this is the 99th post! Yey! Next one will be the anniversary 100th!
The fourth and last set of figurines that my mentor Martin Punchev sent me consists of three models - a wild boar, another lizard guy, but this time he is a warrior and one mysterious forest nymph.
In this blog post I will be talking about the model of the wild boar. It was created by Albena Boeva for the Character design course at CGZEN.
He seems like a cool guy to me. Probably is ready to drop his new disco album! :D
Model analysis
Our object of interest today is separated into nine different parts. For this project each and every one of them has it's own important details which we have to show and of course be very carefull with the placement on the buildplate.
As you can see the ears might create some problems since they are the smallest. The legs also need some attention because they have details on the back as well. Same goes for the body and the head.
In 3Ds Max the model was scaled to 2200% which is exactly 15 cm height in Cura. Just what we need! Again no parts will be moveable and everything will be glued together in the end.
Slicing in Cura
With this journal entry I am starting the countdown to the end of this project! Also I see that this is the 99th post! Yey! Next one will be the anniversary 100th!
The fourth and last set of figurines that my mentor Martin Punchev sent me consists of three models - a wild boar, another lizard guy, but this time he is a warrior and one mysterious forest nymph.
In this blog post I will be talking about the model of the wild boar. It was created by Albena Boeva for the Character design course at CGZEN.
 |
| The wild boar by Albena Boeva |
Model analysis
Our object of interest today is separated into nine different parts. For this project each and every one of them has it's own important details which we have to show and of course be very carefull with the placement on the buildplate.
 |
| The model imported into 3Ds Max |
In 3Ds Max the model was scaled to 2200% which is exactly 15 cm height in Cura. Just what we need! Again no parts will be moveable and everything will be glued together in the end.
Slicing in Cura
First of lets start with the less complicated things. How about one of the arms?
 |
| One of the arms sliced in Cura |
The struggle here was which side of the arm to sacrifice to the supports. The hooves are important and they should stay undamaged at any cost! There is this really nice flat surface that was cut in order to glue it to the body and so I decided to use this opportonity and placed the object as shown on the picture. This way I made sure that the first layer will have a stable base.
Settings:
With the body I also faced the dillema which one to ruin in the support hell - front or back. Of course the back won since the details there are the most.
- Layer height - 0.12mm
- Infill - Grid pattern, 20%
- Supports - Touching buildplate, Density - 45%, Pattern - Grid, Support Z distance - 0.3mm
- Buildplate adhesion - Brim
- Nozzle diameter - 0.4mm
- Time taken - 48 minutes
 |
| The body sliced in Cura |
Settings:
- Layer height - 0.12mm
- Infill - Gyroid pattern, 10%
- Supports - Touching buildplate, Density - 45%, Pattern - Grid, Support Z distance - 0.3mm
- Buildplate adhesion - Brim
- Nozzle diameter - 0.4mm
- Time taken - 2 hours 10 minutes
 |
| The head sliced in Cura |
For the head I couldn't think of a better placement. There are supports on both front and back sides of the object. Here I gave a bit more resolution to the face for better looking results.
Settings:
- Layer height - 0.1mm
- Infill - Gyroid pattern, 8%
- Supports - Touching buildplate, Density - 45%, Pattern - Grid, Support Z distance - 0.3mm
- Buildplate adhesion - Brim
- Nozzle diameter - 0.4mm
- Time taken - 4 hours
 |
| The leg sliced in Cura |
Ouch, this probably hurts! The truth is it was the only way to place the supports everywhere since there were details on both sides. After printing I managed to remove them very easily.
Settings:
Settings:
- Layer height - 0.12mm
- Infill - Gyroid pattern, 8%
- Supports - Everywhere, Density - 45%, Pattern - Grid, Support Z distance - 0.3mm
- Buildplate adhesion - Brim
- Nozzle diameter - 0.4mm
- Time taken - 1 hour 10 minutes
 |
| The tail sliced in Cura |
This was the only possible placement for the tail on the buildplate.I had to save the details on the top somehow.
Settings:
Saved the ears for the end. Since I don't keep anymore the old .GCODE with the supports, I am posting this set up on the picture. First try with the supports was kinda successfull, while the one without on the pic wasn't... I used the 0.4mm nozzle, because I was scared to make any nozzle changes mid project. Plus we were just entering the final stage, my deadline was by the end of January and I really didn't want any complications and delays to happen... So I decided to stick with what was working best. Probably if I used the 0.25mm the result could have been better, who knows?
Settings:
Post print


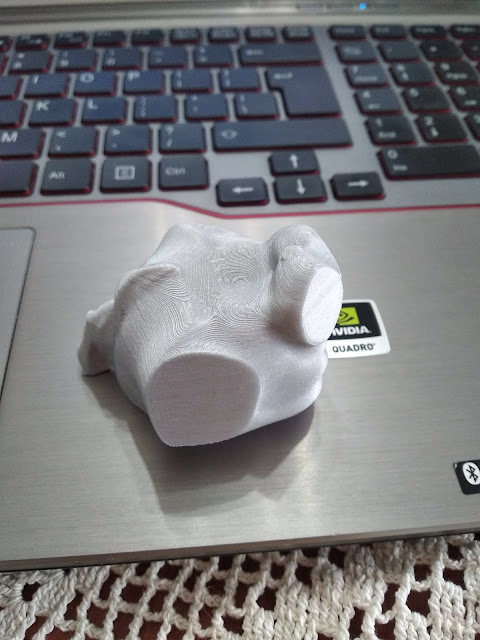

The ears are looking kinda messy, indeed... Everything else turned out really good! This model was printed during the Christmas holidays. I had all the time in the world to tinker around with it. :3
Next time get ready for the 100th blog post! Stay tuned!
Settings:
- Layer height - 0.12mm
- Infill - Grid pattern, 50%
- Supports - Touching buildplate, Density - 45%, Pattern - Grid, Support Z distance - 0.3mm
- Buildplate adhesion - Brim
- Nozzle diameter - 0.4mm
- Time taken - 35 minutes
 |
| The ear sliced in Cura |
Settings:
- Layer height - 0.14mm
- Infill - Grid pattern, 100%
- Buildplate adhesion - Skirt
- Nozzle diameter - 0.4mm
- Time taken - 6 minutes
Post print


The ears are looking kinda messy, indeed... Everything else turned out really good! This model was printed during the Christmas holidays. I had all the time in the world to tinker around with it. :3
Next time get ready for the 100th blog post! Stay tuned!
Коментари
Публикуване на коментар